
|
|
To find the tools: |
|
|
1. |
Click the Save, Print & Send icon on the Navigation panel. |
|
|
2. |
Select the Create Web Page, Send Via E-mail, Set as Wallpaper, Upload to Online Photo Service, or Print to Online Photo Service flyout. |
|
The Send activities include Create Web Page, Send Via E-mail, Set As Wallpaper, Upload to Online Photo Service, and Print to Online Photo Service.
To convert a photo, project, album or slide show to a Web page:
|
|
MGI PhotoSuite II will save your web page to a destination on your hard drive. An alert box will appear, indicating the drive and folder where your web page has been saved.
|
To send your photo, project or slide show via e-mail:
|
|
|
To set your photo or project as Windows Wallpaper:
|
|
Your work will be set as Wallpaper on your Windows desktop.
|
To upload your photo to an Online Photo Service:
|
|
|
There are a number of online photo service companies that do one or more of the following:
develop you film and provide digital versions of your photos
store your photos for internet access
allow you to upload electronic images for placement on as mugs, t-shirts and other novelty items.
You must have an existing account with an online photo service to upload photos.
If you choose to upload an album, all photos contained in the album will be uploaded, minus any sound files you had attatched to them.
If you have previously gotten a photo from an online service, the roll you used will appear in the Film drop-down menu:

If not, or if you want to upload a different roll, click New Film. A dialog will appear, asking for the name or account information:

Identifying the film by Name
If you choose to identify the film by Name, enter the information in the Name and Roll fields. The information in the Roll field must be accurate, because it itentifies the actual film ID of the roll on the photo service's network.
Click OK to view the thumbnails of the specified film in the Work area.
To upload, drag photos from the Photo Library to the Work area. Click the Upload button to upload all of the thumbnails to the film selected in the Film drop-down menu.
Identifying the film by Account
If you choose to identify the film by Account, enter the Account name and Password fields. If you know the server where the roll resides, select it from the Server drop-down menu. If you do not know the server, set the server drop-down menu to Search for Account, and MGI PhotoSuite II will attempt to locate the account on the online photo developer's network.
Click the Get button to view all rolls that exist with the specified account. Select a roll and then click OK to view the thumbnails of the selected film in the Work area.
To upload, drag photos from the Photo Library to the Work area. Click the Upload button to upload all of the thumbnails to the film selected in the Film drop-down menu.
To print your photo to an Online Photo Service:
|
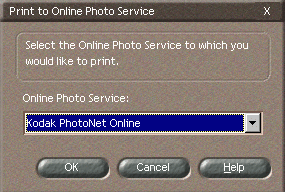
A dialog will appear, asking which online photo service you want to print to. This will contain a choice of online services.

Select the service and click OK. The image(s) will then bet uploaded.
When the upload is complete, the Internet module will be activated and will automatically go to a special URL on the selected online service where the photo can be viewed. There, you will have a number of options: you can order prints of the uploaded photo, order novelties - ie. a mug with the image on it -, and whatever else the service provides.
It costs nothing to upload images. The image will remain at the special URL for a certain period of time; usually 24 hours.